
How to Install Oven Door Glass?
Oven door glass replacement might seem like a daunting task, but with the right tools and knowledge, you can tackle this repair project yourself. Broken or cracked oven door glass compromises your appliance’s efficiency and poses safety risks. This comprehensive guide walks you through the entire process of installing new oven door glass, helping you save money on professional repairs while ensuring your kitchen remains functional.
Signs You Need Oven Door Glass Replacement
Your oven door glass serves multiple purposes beyond just letting you peek at your cooking food. The glass maintains proper heat retention, protects you from burns, and keeps your kitchen clean by preventing grease splatter. Several warning signs indicate that your oven door glass needs replacement.
Visible cracks represent the most obvious sign of damaged oven door glass. These cracks can start small but spread quickly due to temperature fluctuations during cooking cycles. Even hairline fractures compromise the glass’s structural integrity and can lead to complete failure.
Shattered glass pieces inside the door create another clear indication that replacement is necessary. This situation requires immediate attention since loose glass fragments can fall into your food or onto the oven floor during cooking.
Heat escaping from around the door edges suggests that your oven door glass no longer seals properly. This problem reduces cooking efficiency and increases energy costs while making your kitchen uncomfortably warm during baking sessions.
Discoloration or permanent staining on the glass surface that cleaning cannot remove also warrants replacement. While cosmetic issues don’t affect functionality, they can impact your kitchen’s appearance and make it difficult to monitor cooking progress.
Essential Tools and Materials for Glass Installation
Proper preparation ensures a smooth installation process. Gathering all necessary tools and materials before starting prevents frustrating interruptions that could extend your repair time.
Safety equipment tops the priority list for any oven repair project. Heat-resistant gloves protect your hands from sharp glass edges and hot surfaces. Safety glasses shield your eyes from glass fragments, while closed-toe shoes prevent foot injuries if glass pieces fall during removal.
Basic hand tools make the installation process manageable. A screwdriver set with both flathead and Phillips head options handles various screw types found in different oven models. Pliers help grip small components and remove stubborn clips. A flashlight or headlamp illuminates dark spaces inside the oven door assembly.
The replacement glass itself requires careful selection. Measure your existing glass panel accurately or consult your oven’s model number to ensure proper fit. Tempered glass designed specifically for oven applications withstands high temperatures and thermal shock better than regular glass.
Cleaning supplies prepare the installation area and ensure optimal results. Glass cleaner removes fingerprints and residue from the new panel. Soft cloths prevent scratching during cleaning and installation. A vacuum cleaner helps remove glass fragments and debris from the door cavity.
Safety Precautions Before Starting
Oven door glass installation involves potential hazards that require careful attention to safety protocols. Taking proper precautions protects you from injury and prevents damage to your appliance.
Electrical safety comes first when working with any kitchen appliance. Disconnect your oven from its power source by unplugging it or switching off the circuit breaker. Gas ovens require additional attention – turn off the gas supply valve before beginning any repair work.
Temperature considerations play a crucial role in safe glass installation. Allow your oven to cool completely before starting the repair. Hot surfaces can cause severe burns, and temperature differences can cause new glass to crack during installation.
Work area preparation minimizes accident risks and makes the job easier. Clear your workspace of unnecessary items and ensure adequate lighting. Place old towels or cardboard on the floor to catch falling glass pieces and protect your flooring.
Personal protective equipment remains essential throughout the entire process. Wear safety glasses consistently, not just during glass removal. Heat-resistant gloves protect against both sharp edges and residual heat from recent oven use.
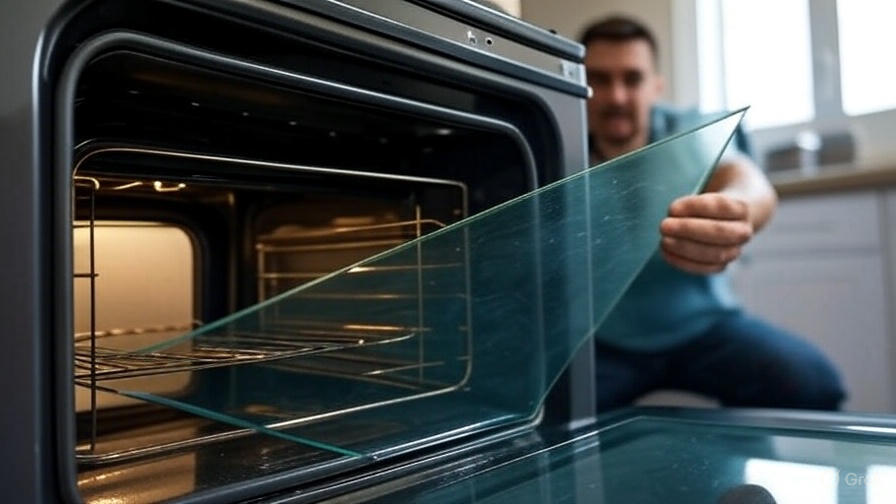
Removing the Damaged Oven Door
Most oven door glass replacement projects begin with removing the entire door from the oven. This step provides better access to the glass panels and makes the work safer and more comfortable.
Door removal methods vary between oven manufacturers, but most follow similar principles. Open the oven door to its fully open position, which typically locks the hinges in place for removal. Look for hinge locks or clips near the bottom corners of the door frame.
Hinge release mechanisms come in several designs. Some models feature spring-loaded clips that you push down while lifting the door. Others use sliding locks that move horizontally to release the hinges from their mounting points. Consult your oven’s manual for specific instructions if the mechanism isn’t immediately apparent.
Lifting the door requires careful technique to prevent injury and damage. Grasp the door firmly on both sides, keeping your back straight and using your leg muscles for lifting power. The door assembly weighs significantly more than it appears, so don’t underestimate the effort required.
Setting the door in a safe location prevents accidental damage during the repair process. Choose a flat, stable surface covered with soft material like towels or blankets. Position the door so that damaged glass pieces won’t fall and create additional hazards.
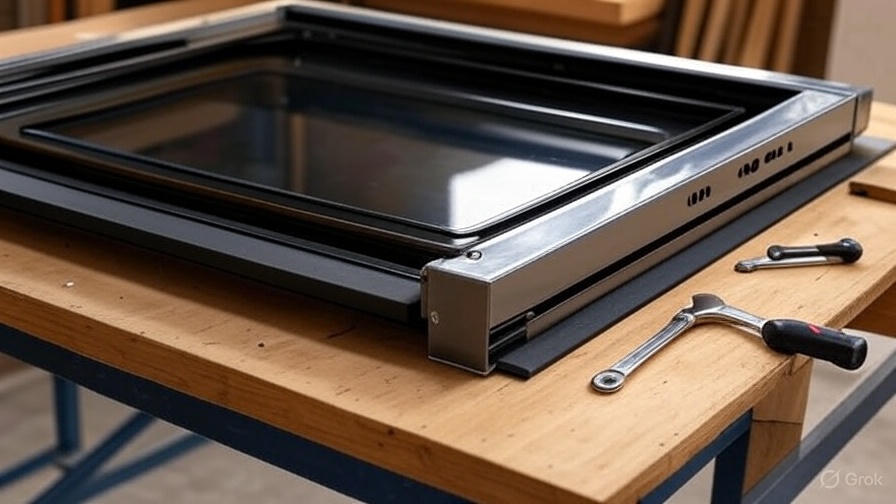
Accessing the Glass Panel Assembly
With the oven door safely removed, you can now access the internal glass panel assembly. Most oven doors contain multiple glass layers separated by air spaces for improved insulation.
Door disassembly begins with locating the retaining screws or clips that hold the door panels together. These fasteners are typically found along the top and bottom edges of the door frame, though some models place them on the sides.
Inner door panel removal exposes the glass layers and allows access to the damaged panel. Remove screws carefully and keep them organized in a small container to prevent loss. Some panels lift straight up, while others require sliding motions to disengage from mounting tracks.
Glass panel identification helps ensure you replace the correct piece. Most oven doors contain two or three glass panels with specific positions and orientations. Take photos before disassembly to reference during reassembly.
Cleaning opportunity presents itself once you have access to all glass surfaces. Clean both sides of undamaged panels while they’re easily accessible. This maintenance step improves visibility and extends the life of remaining glass components.
Removing Broken Glass Safely
Broken glass removal requires extra caution to prevent cuts and ensure complete cleanup. Even small glass fragments can cause problems if left in the door assembly.
Fragment containment starts before you touch any broken pieces. Place newspaper or plastic sheeting around your work area to catch falling glass. This preparation makes cleanup easier and prevents glass from spreading throughout your kitchen.
Large piece removal comes first when dealing with shattered glass. Use pliers or tongs to grip substantial fragments, never your bare hands even with gloves. Place removed pieces in a sturdy container or wrap them in newspaper before disposal.
Small fragment cleanup requires systematic attention to detail. Use a slice of bread or tape to pick up tiny glass pieces that escaped initial removal efforts. A flashlight helps locate remaining fragments that might be difficult to see.
Cavity inspection ensures no glass remains in the door assembly before installing the new panel. Run your gloved finger along all surfaces and channels where glass fragments might hide. Any remaining glass could interfere with proper installation or cause noise during oven operation.
Preparing the New Glass Panel
New glass panel preparation ensures optimal installation results and prevents damage during the process. Proper handling and cleaning create the foundation for a successful repair.
Unpacking the replacement glass requires careful attention to prevent damage before installation even begins. Remove packaging materials slowly and inspect the glass for any shipping damage. Handle the panel by its edges only, avoiding contact with the flat surfaces that could leave fingerprints or cause stress fractures.
Cleaning the new glass removes manufacturing residues and ensures crystal-clear visibility after installation. Use glass cleaner and lint-free cloths to clean both surfaces thoroughly. Avoid paper towels that can leave fibers or scratches on the glass surface.
Size verification confirms that you have the correct replacement part. Compare the new glass dimensions with the original panel or the space it will occupy. Check thickness as well as length and width measurements to ensure proper fit.
Orientation marking helps prevent installation mistakes. Some glass panels have specific top and bottom orientations that aren’t immediately obvious. Mark the correct orientation with removable tape before beginning installation.
Installing the New Glass Panel
Glass panel installation requires patience and precision to achieve professional results. Rushing this step can lead to improper fit or damage to the new glass.
Positioning the new glass starts with aligning it properly in the door frame. Lower the glass slowly into position, checking that it sits evenly in its mounting channels or clips. The glass should rest securely without forcing or applying excessive pressure.
Securing mechanisms vary between oven models but typically involve clips, springs, or retaining frames. Install these components in the reverse order of removal, ensuring each piece engages properly with the glass panel.
Gap inspection verifies that the glass sits correctly in its final position. Check all edges for consistent spacing and proper alignment with adjacent panels. Uneven gaps indicate misalignment that could cause problems during oven operation.
Stability testing confirms that the glass panel is securely installed before reassembly. Gently press on the glass to ensure it doesn’t move or flex excessively. Properly installed glass should feel solid and stable in its mounting system.
Reassembling the Oven Door
Door reassembly reverses the disassembly process while ensuring all components return to their proper positions. Take your time during this step to avoid mistakes that could require repeating the entire process.
Component alignment starts with positioning the inner door panels correctly. Reference your earlier photos to ensure each piece returns to its original location and orientation. Misaligned components can prevent proper door closure or interfere with glass visibility.
Fastener installation secures all door components in their final positions. Replace screws in their original locations and tighten them evenly to prevent warping or stress on the glass panels. Avoid over-tightening, which can crack glass or strip screw threads.
Operation testing verifies that door mechanisms function properly after reassembly. Open and close any sliding panels or access doors to ensure smooth operation. All moving parts should function as smoothly as they did before disassembly.
Final inspection checks for any issues that need attention before reinstalling the door on the oven. Look for loose components, misaligned parts, or any signs that reassembly wasn’t completed properly.
Reinstalling the Oven Door
Oven door reinstallation completes your glass replacement project. This final step requires the same care and attention as the initial removal process.
Hinge alignment ensures proper door operation after installation. Position the door hinges carefully over their mounting points on the oven frame. The hinges should slide into place without forcing or binding.
Engagement verification confirms that the door attaches securely to the oven. Lower the door slowly while guiding the hinges into their proper positions. You should feel or hear the hinges engage fully with their mounting hardware.
Operation testing checks door function before considering the job complete. Open and close the door several times to ensure smooth operation and proper sealing. The door should close completely and latch securely without binding or resistance.
Final adjustments may be necessary to achieve optimal door alignment. Some oven models include adjustment screws that fine-tune door position and sealing. Consult your oven manual for specific adjustment procedures if needed.
Testing Your Installation
Installation testing verifies that your glass replacement was successful and identifies any issues that need correction. Thorough testing prevents problems from appearing during regular oven use.
Visual inspection starts the testing process. Look through the new glass to ensure clear visibility and check for any obvious installation problems. The glass should appear properly seated and aligned with no gaps or misalignment.
Seal testing confirms that the door creates a proper seal when closed. Close the door completely and check for gaps around the edges where heat could escape. A properly installed door should seal tightly against the oven frame.
Heat test provides the ultimate verification of successful installation. Run your oven through a complete heating cycle while monitoring the door glass for any problems. Watch for excessive heat around the door edges or any unusual sounds that might indicate installation issues.
Performance evaluation assesses whether your repair achieved its intended goals. The door should retain heat properly, provide clear visibility of cooking food, and operate smoothly throughout its full range of motion.
Maintenance Tips for Long-Lasting Results
Proper maintenance extends the life of your new oven door glass and prevents premature replacement needs. Simple care practices protect your investment and ensure continued safe operation.
Regular cleaning prevents buildup that can damage glass over time. Clean the glass after each use while it’s still warm but not hot. Use appropriate glass cleaners and soft cloths to avoid scratching the surface.
Temperature management reduces thermal stress that can cause glass failure. Avoid extreme temperature changes such as placing cold items against hot glass or opening the door immediately after high-temperature cooking cycles.
Impact prevention protects against physical damage that causes most glass failures. Keep hard objects away from the door glass and teach family members to close the door gently rather than slamming it.
Inspection routine helps catch potential problems before they become serious issues. Check the glass regularly for small cracks or chips that could spread. Early detection allows for timely replacement before complete failure occurs.
Troubleshooting Common Issues
Installation problems can occur even with careful attention to detail. Recognizing and addressing these issues quickly prevents more serious complications.
Poor door sealing often results from misaligned glass or incorrect reassembly. Check that all door components returned to their proper positions and that the glass sits evenly in its mounting system.
Glass movement or rattling indicates loose mounting hardware or improper installation. Disassemble the affected area and verify that all clips, springs, and retaining mechanisms engage properly with the glass panel.
Visibility problems such as distortion or cloudiness may result from damaged glass or improper cleaning. Ensure you installed the correct replacement glass and that both surfaces are completely clean.
Operating difficulties including hard-to-open doors or poor closure suggest alignment problems. Check hinge operation and door adjustment mechanisms to restore proper function.
When to Call a Professional
Some situations require professional expertise despite your best efforts at DIY repair. Recognizing these circumstances prevents further damage and ensures safe operation.
Complex door designs with multiple moving parts or electronic components may exceed typical homeowner skill levels. Gas ovens with integrated door switches or electronic controls require specialized knowledge for safe repair.
Recurring problems after installation suggest underlying issues that need professional diagnosis. Multiple glass failures or persistent sealing problems indicate more serious appliance problems that require expert attention.
Safety concerns should always prompt professional consultation. If you feel uncomfortable with any aspect of the repair or encounter unexpected complications, stop work and contact a qualified technician.
Warranty considerations may influence your decision to attempt DIY repairs. Some oven warranties become void if homeowners perform certain repairs, so check your warranty terms before beginning work.
Installing oven door glass represents a manageable DIY project that saves money while maintaining your kitchen’s functionality. With proper preparation, the right tools, and careful attention to safety, you can successfully complete this repair and enjoy clear visibility during cooking for years to come. Take your time, follow safety protocols, and don’t hesitate to seek professional help if you encounter unexpected complications during the installation process.

Hi, I’m Mary, the founder of KitchenClue.com. I’m deeply passionate about everything that makes a kitchen smarter, easier, and more enjoyable. I share hands-on insights and practical expertise on kitchen gear that truly helps in daily cooking. Along with my dedicated research team, we study products carefully, and our writers create honest, well-tested reviews using trusted, authentic sources—so you can choose kitchen tools with total confidence.