How to Use a Cast Iron Tortilla Press?
Making fresh tortillas at home transforms your kitchen into a Mexican bakery. The aroma of warm corn masa fills the air while you create perfectly round, evenly pressed tortillas that taste infinitely better than store-bought versions. A cast iron tortilla press makes this process simple, efficient, and enjoyable.
Cast iron tortilla presses have become essential tools for home cooks who want authentic results. These heavy-duty kitchen implements create uniform thickness across your tortillas while maintaining the traditional texture and flavor that makes homemade tortillas so special.
Why Cast Iron Tortilla Presses Outperform Other Options
Cast iron delivers superior results compared to aluminum or wooden presses. The weight of cast iron provides even pressure distribution, ensuring each tortilla receives consistent compression. This material retains heat well, which helps warm the masa slightly during pressing and creates better pliability.
The durability of cast iron means your tortilla press will last generations with proper care. Unlike aluminum presses that may warp over time or wooden ones that can crack, a well-maintained cast iron press remains reliable year after year.
Cast iron presses also offer better leverage. The substantial weight works with your pressing motion, requiring less effort to achieve perfectly thin tortillas. This makes the pressing process faster and less tiring, especially when making large batches.
Essential Ingredients for Tortilla Success
Masa Harina: The Foundation
Quality masa harina forms the backbone of excellent tortillas. Maseca and Bob’s Red Mill offer reliable options that produce consistent results. Store your masa harina in an airtight container in a cool, dry place to maintain freshness.
The fineness of the grind affects your final product. Finer grinds create smoother tortillas, while coarser grinds add texture. Most home cooks prefer medium-fine grinds for the best balance of workability and texture.
Water Temperature Matters
Warm water helps hydrate the masa more effectively than cold water. Heat your water to around 100-110°F (38-43°C) for optimal results. Hot water can make the dough too sticky, while cold water may not fully activate the masa.
Salt Enhancement
A pinch of salt enhances the corn flavor without overpowering the natural taste. Use about 1/2 teaspoon of salt per 2 cups of masa harina. Sea salt or kosher salt work better than table salt because they dissolve more evenly.
Preparing Your Masa Dough
Start with a 2:1 ratio of masa harina to warm water. Combine 2 cups masa harina with 1 1/4 cups warm water in a large mixing bowl. This ratio provides a good starting point, but you may need slight adjustments based on humidity and the specific brand of masa harina.
Mix the ingredients with a wooden spoon until they form a shaggy dough. Then use your hands to knead the mixture until it becomes smooth and pliable. The dough should feel like Play-Doh – not too wet, not too dry, and easy to shape without cracking.
Test the consistency by forming a small ball and pressing it gently. If cracks appear around the edges, add water one tablespoon at a time. If the dough sticks to your hands excessively, sprinkle in more masa harina gradually.
Let the dough rest for 15-30 minutes covered with a damp towel. This resting period allows the masa to fully hydrate and makes rolling and pressing easier.
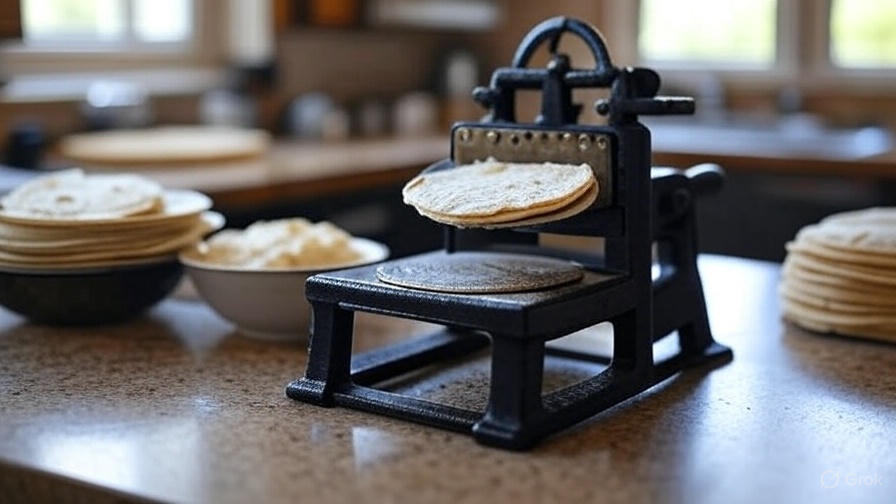
Setting Up Your Cast Iron Tortilla Press
Initial Cleaning and Seasoning
New cast iron tortilla presses need proper seasoning before first use. Wash the press with warm, soapy water to remove manufacturing oils. Dry completely with a towel, then place in a 200°F oven for 10 minutes to eliminate all moisture.
Apply a thin layer of vegetable oil or flaxseed oil to all surfaces using a paper towel. Remove excess oil with a clean cloth – you want just a thin film remaining. Heat the press in a 400°F oven for one hour, then let it cool completely in the oven.
Positioning Your Press
Place your tortilla press on a stable, level surface at a comfortable working height. Counter height works best for most people, allowing you to apply downward pressure effectively without straining your back or arms.
Keep your masa dough, plastic sheets or parchment paper, and a damp towel within easy reach. This setup allows for smooth, efficient tortilla production without unnecessary movement.
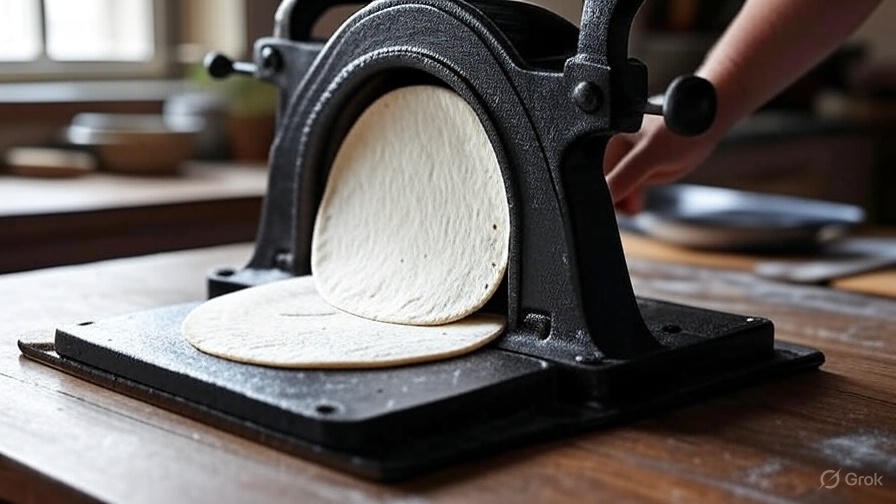
Step-by-Step Pressing Technique
Preparing the Press Surface
Line both plates of your tortilla press with plastic sheets. Cut-open plastic bags work perfectly, or you can use parchment paper. The plastic prevents sticking and makes removal much easier. Some cooks prefer using two pieces of plastic wrap, which also works well.
Portioning Your Dough
Divide your rested masa dough into golf ball-sized portions. Each ball should weigh approximately 1.5-2 ounces (40-55 grams). Keep unused portions covered with a damp towel to prevent drying out.
Roll each portion between your palms to create a smooth, round ball. Any cracks or rough spots will show up in your finished tortilla, so take time to make smooth, uniform balls.
The Pressing Process
Place one dough ball slightly off-center toward the hinge of your press. This positioning helps create more even thickness across the tortilla. Close the top plate gently, then apply firm, steady pressure with the handle.
Press down with your full body weight, using your arms and shoulders for leverage. Hold the pressure for 2-3 seconds, then release. The goal is to flatten the dough evenly without pressing so hard that it becomes paper-thin or tears.
Open the press carefully and check your tortilla. It should be round, even in thickness, and measure about 6 inches in diameter for standard corn tortillas. If it’s too thick, close the press and apply slightly more pressure.
Removing Your Tortilla
Peel back the top plastic layer first, then carefully lift the tortilla by grasping one edge. The tortilla should release easily from the plastic. If it sticks, the dough may be too wet – add a bit more masa harina to your remaining dough.
Cooking Your Pressed Tortillas
Pan Selection and Heat
A well-seasoned cast iron skillet, carbon steel pan, or heavy-bottomed stainless steel pan works best for cooking tortillas. Avoid non-stick pans, which don’t develop the slight char that gives tortillas their characteristic flavor.
Heat your pan over medium-high heat for 3-4 minutes before cooking your first tortilla. The pan should be hot enough that a drop of water sizzles and evaporates within 2-3 seconds.
Cooking Technique
Place your pressed tortilla directly onto the hot, dry pan – no oil needed. The tortilla should sizzle gently when it hits the surface. If there’s no sizzle, increase the heat. If it sizzles aggressively, reduce the heat slightly.
Cook for 30-45 seconds on the first side. You’ll see the edges begin to dry out and the surface may start to bubble slightly. Flip with a thin spatula or your fingers if you’re comfortable with the heat.
Cook the second side for 20-30 seconds. Fresh tortillas cook quickly, and overcooking makes them dry and brittle. The ideal tortilla has light brown spots but remains soft and pliable.
The Puffing Test
Well-made tortillas often puff up during cooking, especially on the second side. This puffing indicates proper hydration and technique. If your tortillas puff, you’ve achieved tortilla perfection – the steam inside creates a natural pocket.
Troubleshooting Common Press Problems
Sticking Issues
If tortillas stick to your press plates, the surface may need re-seasoning. Clean the press thoroughly, then repeat the seasoning process. Always use plastic sheets or parchment paper as a barrier between the dough and metal surfaces.
Overly wet dough also causes sticking. Add masa harina gradually until the dough releases cleanly from the plastic.
Uneven Thickness
Uneven tortillas usually result from inconsistent dough ball sizes or improper pressing technique. Weigh your dough balls for consistency, and make sure you’re applying even pressure across the entire press handle.
Check that your press sits level on your work surface. An uneven surface can cause thickness variations across your tortillas.
Cracking Edges
Dry dough creates tortillas with cracked edges. Add warm water to your masa one tablespoon at a time until the dough becomes more pliable. Old masa harina can also cause cracking, so check the expiration date on your bag.
Tortillas Too Thick or Thin
Adjust your pressing pressure to achieve the desired thickness. For thicker tortillas suitable for quesadillas or tostadas, use less pressure. For thin tortillas perfect for tacos, apply more force.
The size of your dough balls also affects thickness. Larger balls create thicker tortillas when pressed with the same force.
Maintaining Your Cast Iron Tortilla Press
Daily Cleaning
After each use, clean your press while it’s still slightly warm. Use hot water and a stiff brush to remove any dough residue. Avoid soap unless absolutely necessary, as it can remove the seasoning.
Dry the press immediately and thoroughly with a clean towel. Any remaining moisture can cause rust, which will ruin your seasoning and potentially contaminate your tortillas.
Long-term Care
Apply a light coat of oil after cleaning and drying. This prevents rust and maintains the non-stick properties of your seasoned surface. Store your press in a dry location with good air circulation.
If rust appears, remove it with fine steel wool, then re-season the entire press. Regular maintenance prevents major restoration projects and keeps your press in perfect working condition.
Advanced Techniques and Variations
Flavored Tortillas
Experiment with different flavors by adding ingredients to your masa dough. Spinach powder creates green tortillas, while chile powder adds heat and color. Incorporate these additions gradually to avoid affecting the dough’s texture.
Different Masa Types
While masa harina remains the standard, you can experiment with fresh masa from Mexican markets. Fresh masa produces superior flavor and texture but requires different hydration levels and handling techniques.
Size Variations
Create different sized tortillas by adjusting your dough ball portions. Mini tortillas work perfectly for appetizers, while larger ones serve as the foundation for burritos or quesadillas.
Storage and Reheating Tips
Store fresh tortillas wrapped in a clean kitchen towel inside a plastic bag. They’ll stay fresh at room temperature for 2-3 days or in the refrigerator for up to a week. For longer storage, freeze tortillas with parchment paper between each one.
Reheat tortillas on a hot, dry pan for 15-20 seconds per side, or wrap them in a damp paper towel and microwave for 15-30 seconds. The goal is to warm them without drying them out.
Building Your Tortilla-Making Routine
Start with small batches until you develop a rhythm. Making tortillas becomes meditative once you establish a flow: press, cook, press, cook. Many home cooks find the process relaxing and rewarding.
Involve family members in the process. Children love helping portion the dough balls, while adults can manage the pressing and cooking. This shared activity creates lasting memories while producing delicious results.
Conclusion
A cast iron tortilla press opens the door to authentic Mexican cuisine in your home kitchen. The combination of quality ingredients, proper technique, and well-maintained equipment produces tortillas that rival those from the best Mexican restaurants.
The investment in a good cast iron press pays dividends for years. Each tortilla you make costs a fraction of store-bought versions while delivering superior taste and texture. The satisfaction of creating something delicious from simple ingredients never gets old.
Start with basic corn tortillas, then expand your repertoire as your confidence grows. Soon you’ll be pressing tortillas for tacos, quesadillas, enchiladas, and countless other Mexican dishes. Your family and friends will notice the difference, and you’ll wonder why you waited so long to start making fresh tortillas at home.
The journey from masa to tortilla takes just minutes with a cast iron press, but the flavors and memories last much longer. Every pressed tortilla represents a connection to centuries of Mexican culinary tradition, brought right to your kitchen table.