How to Use a Gas Grill as a Smoker?
You don’t need an expensive dedicated smoker to create mouthwatering barbecue at home. Your gas grill can become a versatile smoking machine with the right techniques and setup. This comprehensive guide shows you exactly how to convert your propane grill into an effective smoker that produces restaurant-quality results.
Why Smoke Food on a Gas Grill?
Gas grills offer convenience and temperature control that makes smoking more accessible for beginners. Unlike charcoal smokers that require constant attention, gas grills maintain steady heat with minimal effort. You can achieve authentic smoky flavors while enjoying the ease of gas cooking.
The indirect heat method works perfectly on gas grills. This technique allows you to cook food slowly at low temperatures while infusing it with delicious smoke. Many pitmasters actually prefer gas grills for their consistency and reliability.
Essential Equipment for Gas Grill Smoking
Before you start smoking, gather these basic tools and materials:
Wood chips or chunks form the foundation of great barbecue flavor. Hickory delivers strong, bacon-like taste perfect for pork and beef. Apple provides mild, sweet smoke ideal for poultry and fish. Cherry adds beautiful color and gentle fruitiness. Oak burns clean with medium intensity that complements most meats.
Aluminum pans serve multiple purposes in your smoking setup. Heavy-duty disposable pans work well for holding wood chips and water. You’ll need at least two pans – one for chips and another for a water bath that helps maintain moisture.
Digital thermometer ensures food safety and perfect doneness. Instant-read thermometers give quick temperature checks, while probe thermometers monitor internal temperature throughout the cooking process. Some wireless models let you track progress from inside your house.
Heat-resistant gloves protect your hands when handling hot grates, pans, and food. Silicone or leather gloves rated for high temperatures work best. Regular oven mitts don’t provide enough protection for barbecue smoking.
Spray bottle filled with apple juice, beer, or water helps keep meat moist during long cooking sessions. The liquid also helps smoke adhere to the surface of your food.
Setting Up Your Gas Grill for Indirect Heat
Indirect heat smoking requires careful grill setup to create separate temperature zones. This method prevents food from cooking too quickly while allowing smoke to circulate effectively.
Start by cleaning your grill grates thoroughly. Remove any leftover food particles or grease that could create off-flavors. Clean grates also prevent sticking and make food easier to handle.
Position your wood chip pan on one side of the grill, directly over a burner. This placement ensures chips receive enough heat to produce steady smoke. Place the water pan on the opposite side to create a humid environment that keeps meat moist.
Create your indirect zone by lighting only the burners on one side of your three-burner grill. For two-burner grills, light one burner and place food on the unlit side. The goal is maintaining 225-250°F in the cooking area while the heat source stays separate.
Adjust your burner settings to achieve target temperature. Most smoking happens between 225-275°F, which requires low heat settings. Use your grill’s built-in thermometer as a starting point, but verify temperature with a separate gauge placed near your food.
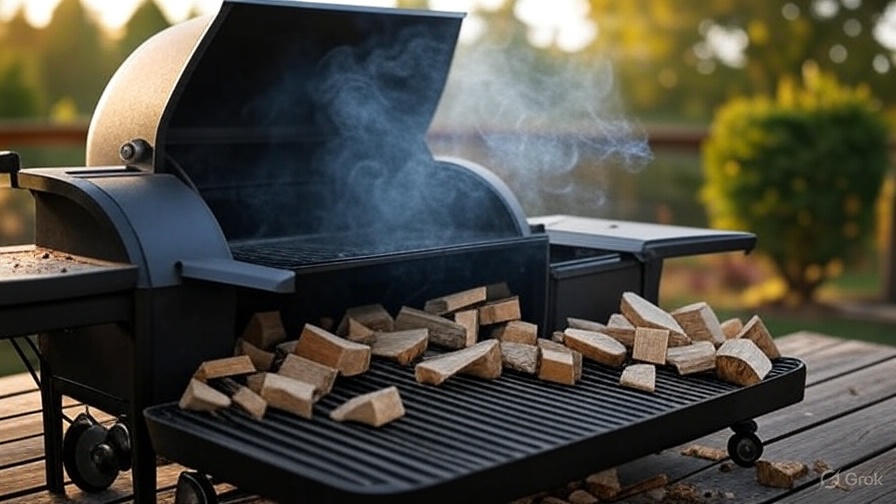
Preparing Wood Chips for Maximum Smoke
Proper wood preparation dramatically impacts smoke quality and duration. Different preparation methods suit various cooking times and flavor preferences.
Soak hardwood chips in water for 30-60 minutes before use. Wet chips smolder longer and produce more consistent smoke than dry chips. However, soaking isn’t always necessary – dry chips ignite faster and work well for shorter cooking sessions.
Wrap soaked chips in aluminum foil pouches with several holes poked through the top. These packets create controlled burning that extends smoke production. Make multiple pouches for longer smoking sessions, adding fresh ones as needed.
Mix different wood types to create custom flavor profiles. Combine fruit woods with stronger varieties like hickory or mesquite. Start with milder woods when experimenting, as you can always add more intensity next time.
Avoid softwoods like pine or cedar that contain resins harmful to food. Stick with hardwoods specifically sold for cooking. Green or freshly cut wood produces bitter smoke, so use only seasoned, dry wood.
Temperature Control Techniques
Maintaining steady smoking temperature requires attention and small adjustments throughout the cooking process. Gas grills make this easier than charcoal, but you still need active management.
Monitor both grill temperature and food temperature regularly. Place an oven-safe thermometer near your food to track cooking zone temperature. The built-in grill thermometer often reads higher than actual cooking temperature.
Make gradual burner adjustments to maintain your target range. Temperature swings are normal, but try to keep variations within 25°F of your target. Small adjustments work better than dramatic changes that cause temperature spikes.
Account for weather conditions that affect temperature control. Wind increases heat loss and requires higher burner settings. Cold weather has similar effects. Hot summer days may require lower settings to prevent overheating.
Use water pans strategically for temperature stability. Water absorbs and releases heat slowly, creating a buffer against temperature swings. Refill water pans as needed, but avoid opening the lid too frequently.
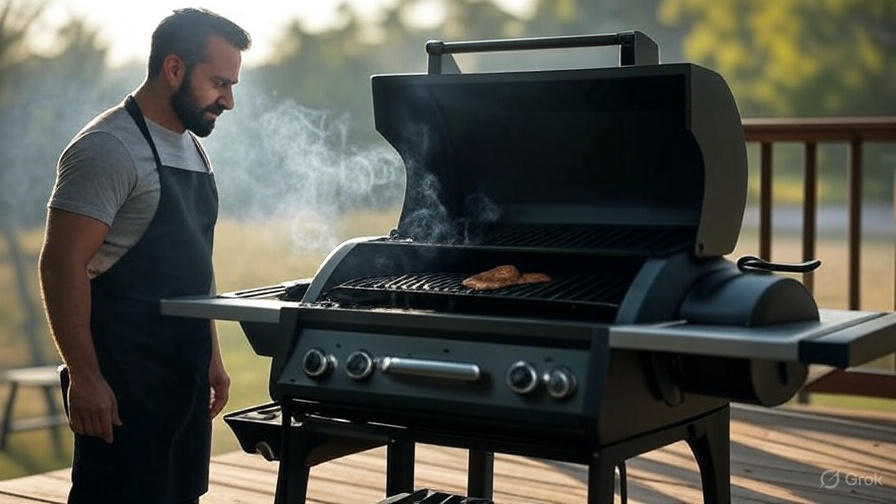
Step-by-Step Smoking Process
The actual smoking process follows a logical sequence that builds layers of flavor while cooking food safely and thoroughly.
Preheat your grill with all burners on medium for 10-15 minutes. This initial heating burns off any residual cleaning products and stabilizes the grill temperature. Clean the grates one final time while they’re hot.
Place your prepared wood chip packet directly on the lit burner. Position it where it will receive direct heat but won’t block air circulation. You should see smoke beginning within 5-10 minutes.
Season your meat generously with dry rubs or marinades. Apply seasonings at least 30 minutes before cooking, or overnight for deeper flavor penetration. Pat meat dry before placing on the grill to promote better smoke adhesion.
Position food on the unlit side of your grill, away from direct heat. Leave space between pieces for smoke circulation. Place thicker cuts farther from the heat source, with thinner pieces closer to the temperature divide.
Close the lid and resist the urge to peek frequently. Every time you open the lid, heat and smoke escape. The old saying “if you’re looking, you’re not cooking” applies perfectly to smoking.
Add fresh wood chips every 45-60 minutes during the first half of cooking. After that point, meat stops absorbing smoke flavor effectively. Too much smoke late in the process creates bitter, acrid flavors.
Smoking Different Types of Meat
Each type of meat requires specific techniques and timing for optimal results. Understanding these differences helps you plan successful smoking sessions.
Beef brisket represents the ultimate smoking challenge and reward. This tough cut transforms into tender, flavorful barbecue through low, slow cooking. Plan 12-16 hours for whole packer briskets, maintaining 225°F throughout. The internal temperature should reach 195-205°F for proper tenderness.
Wrap brisket in butcher paper or foil when it reaches 160-170°F internal temperature. This technique, called the Texas Crutch, pushes through the stall period where temperature plateaus. The wrap retains moisture while accelerating cooking.
Pork shoulder offers forgiving smoking for beginners. This fatty cut stays moist even if slightly overcooked. Smoke at 225-250°F until internal temperature reaches 195-205°F, typically 12-14 hours for an 8-pound shoulder.
Pull pork shoulder apart with forks or meat claws while it’s still warm. The collagen breaks down into gelatin during long cooking, creating the signature texture. Mix in some of the rendered fat for extra richness.
Ribs cook faster than large roasts but still benefit from slow smoking. Baby back ribs need 4-5 hours at 225°F, while spare ribs require 5-6 hours. Look for meat that pulls back from the bone ends as a doneness indicator.
Apply barbecue sauce during the final 30 minutes of cooking to prevent burning. The sugars in sauce caramelize at high temperatures but turn bitter if exposed too long. Brush on thin layers rather than thick coatings.
Chicken smokes beautifully but requires attention to food safety. Maintain higher smoking temperatures around 275-300°F for poultry to ensure skin crisps properly. Internal temperature must reach 165°F in the thickest part of the thigh.
Brine chicken beforehand for extra moisture and flavor. A simple salt water solution works, or try more complex brines with herbs and spices. Pat skin completely dry before seasoning for crispier results.
Fish needs gentle treatment and shorter cooking times. Salmon, trout, and other oily fish work best for smoking. Use milder woods like apple or cherry. Cook at 225°F until fish flakes easily, usually 1-2 hours depending on thickness.
Timing and Planning Your Smoking Session
Successful smoking requires careful planning and realistic time expectations. Most beginners underestimate cooking times and end up serving dinner late.
Start your smoking session much earlier than you think necessary. Large cuts like brisket or pork shoulder can take 12+ hours. Build in extra time for temperature fluctuations, stalls, and resting periods.
The stall phenomenon occurs when meat temperature plateaus around 150-170°F. This happens as moisture evaporates from the surface, cooling the meat. Stalls can last several hours but are completely normal. Don’t increase heat – just be patient.
Plan your timeline backwards from serving time. Factor in resting time after cooking – large roasts should rest 30-60 minutes before slicing. This allows juices to redistribute throughout the meat.
Keep backup plans ready for timing issues. You can hold finished meat in a warm oven (170°F) for several hours if it finishes early. For late-running sessions, increase temperature slightly or use the Texas Crutch to speed cooking.
Troubleshooting Common Smoking Problems
Even experienced pitmasters encounter challenges when smoking on gas grills. Recognizing problems early helps you make corrections before they ruin your meal.
Insufficient smoke production often results from improper wood chip placement or inadequate heat. Ensure chips receive direct heat from the burner. Dry chips may be necessary if soaked chips won’t ignite properly.
Bitter or acrid smoke flavors come from too much smoke or burning chips too hot. Reduce the amount of wood and ensure chips smolder rather than flame. White or blue smoke indicates proper burning, while thick gray smoke suggests problems.
Uneven cooking happens when heat distribution isn’t uniform across the grill. Rotate food periodically to promote even cooking. Check for blocked burner holes or uneven gas flow that might create hot spots.
Dried out meat results from excessive heat, insufficient moisture, or overcooking. Use water pans to maintain humidity. Spray meat periodically with liquid. Monitor internal temperatures closely to avoid overcooking.
Temperature control issues may stem from wind, faulty thermometers, or improper burner adjustment. Shield your grill from wind when possible. Verify thermometer accuracy with boiling water tests. Make small, gradual adjustments rather than dramatic changes.
Advanced Smoking Techniques
Once you master basic smoking, these advanced techniques add complexity and variety to your barbecue repertoire.
Cold smoking infuses flavor without cooking food. This technique requires temperatures below 90°F and works well for salmon, cheese, and salt. Use a smoke generator tube or maze to produce smoke without heat from gas burners.
Hot smoking combines cooking and flavoring in one process. Most barbecue falls into this category. Temperatures range from 225-300°F depending on the specific recipe and desired results.
Reverse searing starts with low-temperature smoking, then finishes with high heat for crispy exteriors. This technique works excellently for steaks and chops. Smoke until nearly done, then move to direct high heat for 2-3 minutes per side.
Injection techniques add moisture and flavor deep inside large cuts. Use injection needles to introduce marinades, broths, or melted butter throughout the meat. Multiple injection points ensure even distribution.
Smoke rings create the pink coloration prized in competition barbecue. The ring forms when nitrogen dioxide in smoke reacts with meat proteins. Good airflow and proper wood burning produce the best rings.
Safety Considerations
Smoking meat involves extended cooking times and temperature monitoring that require attention to food safety principles.
Always use a reliable meat thermometer to verify doneness. Visual cues can be misleading, especially with smoked meats that develop dark exteriors. Internal temperature is the only reliable doneness indicator.
Keep raw and cooked foods separate throughout the process. Use different utensils and cutting boards for raw meat preparation and cooked meat handling. Wash hands thoroughly after handling raw meat.
Maintain proper refrigeration for marinated or seasoned meat before cooking. Don’t leave seasoned meat at room temperature for more than 2 hours. Start with properly chilled meat for food safety.
Monitor propane levels throughout long smoking sessions. Running out of gas mid-cook can create food safety issues. Keep a backup tank available for extended smoking sessions.
Store leftover smoked meat properly in the refrigerator within 2 hours of cooking. Slice only what you plan to serve immediately. Properly stored smoked meat keeps 3-4 days refrigerated.
Maintenance and Cleaning
Regular maintenance keeps your gas grill functioning properly for smoking and extends its lifespan significantly.
Clean grates thoroughly after each smoking session. Food particles and grease buildup affect flavor and create hot spots. Soak grates in warm, soapy water, then scrub with a grill brush.
Empty and wash water pans and chip containers completely. Leftover moisture and debris can promote rust and bacterial growth. Dry all components thoroughly before storage.
Check and clean burner tubes regularly. Spiders and insects sometimes build nests in gas lines, blocking proper gas flow. Use a thin wire or pipe cleaner to clear blocked holes.
Inspect gas connections for leaks using soapy water. Bubbles indicate gas leaks that require immediate attention. Replace worn hoses or fittings before your next smoking session.
Cover your grill when not in use to protect it from weather damage. Quality covers prevent rust and extend the life of your smoking equipment.
Conclusion
Transforming your gas grill into an effective smoker opens up endless possibilities for creating exceptional barbecue at home. The convenience of gas combined with proper smoking techniques produces results that rival expensive dedicated smokers.
Success comes from understanding the fundamentals: indirect heat, proper wood selection, temperature control, and patience. Start with forgiving cuts like pork shoulder or ribs while you develop your technique. Each smoking session teaches you something new about managing your specific grill and achieving your preferred flavors.
The journey from gas grilling to barbecue smoking represents a rewarding progression that expands your cooking skills dramatically. With practice and attention to detail, your gas grill becomes a versatile tool capable of producing world-class barbecue that impresses family and friends.
Remember that great barbecue takes time to develop both in the cooking process and in building your skills. Be patient with yourself and your equipment. Every pitmaster started exactly where you are now, learning through trial and experience. Your gas grill smoking adventure begins with your very next session.